Knowledge base 107: Using SQL Backup Master to backup and restore SQL Databases.
The following Bulletin explains how to install and configure SQL Backup Master to backup and restore SQL databases.
Installing SQL Backup Master & Creating a Backup
1. Download SQL Backup Master from the following link –
2. Run the download “sbm-setup.exe” file and install.
3. At the end of the install select “Run SQL Backup Master Now”.
4. Click the “Create new database backup” button at the top of the window -
5. Click the “Choose SQL Server…” button -
6. Select the drop-down list on the right-hand side -
7. Select the SQL Server to backup -
8. Now select “Connect using the following SQL Server Account”
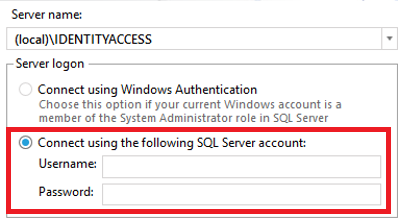
9. Enter the following credentials –
Username = sa
Password = C0ntr0lS0ftAdm1n@!
*Please note the capital C and S in the password and Zero’s instead of O’s*
10. Click "OK"
11. Select "Show system database"
12. Select all of the following databases -

13. Next Under Destinations Click Add, for this
example
we will configure Local or Network Folder
14. Select “Local or Network Folder” then press “Select”.
15. Now click “Browse”. Navigate to the folder you want to save the backup to. If this is a network drive you may need to specify Authentication Credentials.

16. Once the folder has been selected, click “OK”. Click “OK” once again.
17. You can now Configure a schedule if required -
18. Make sure to give your backup a meaningful name and description if required.
19. Once you are happy with these settings click “Save”.
20. Now click “Back up now”

If you are restoring the databases on a new machine, you need need to move the database files to the same location as on the current Identity Access Server and setup a backup set as below. The backups should then be selectable as shown below.
Restoring using SQL Backup Master
Restoring Database (Version 8 / 2017 or 2016)
1. To restore a Database, first close down the Identity Access as well as the Download Server & Log the Server from the system tray.
2. Ensure there is a backup configured on the PC as per the first section of this bulletin.
3. Click "Recover".
4. Select the Backup Job you previously created.
5. Click “Recover” next to the database file you wish to restore.
The system configuration is stored under the IAMain database.
The access logs (who accessed what reader) are stored under the IAAccesslog
Under the IASystemlog are stored any software changes and RTE button activity and the IATALog stores any time and attendance logs
Under the IASystemlog are stored any software changes and RTE button activity and the IATALog stores any time and attendance logs
6. Restart Identity Access and check the data has been restored.
Restoring Database (Version 9)
1. To restore a database, first close down the Identity Access as well as the Download Server & Log the Server from the system tray.

2. Go to the Windows Services, you can use the Windows Run or Search functions and type services.msc

3. Find the Identity Access Download Server and Log Server in the list, right click and select "Stop".

4. Load SQL Backup Master.
5. Ensure there is a backup configured on the PC as per the first section of this bulletin.
6. Click "Recover".

7. Select the Backup Job you previously created.

8. Click “Recover” next to the database file you wish to restore.
The system configuration is stored under the IAMain database.
The access logs (who accessed what reader) are stored under the IAAccesslog
Under the IASystemlog are stored any software changes and RTE button activity and the IATALog stores any time and attendance logs
9. Restart Identity Access and check the data has been restored.
1. To restore a database, first close down the Identity Access as well as the Download Server & Log the Server from the system tray.
2. Go to the Windows Services, you can use the Windows Run or Search functions and type services.msc
3. Find the Identity Access Download Server and Log Server in the list, right click and select "Stop".
4. Load SQL Backup Master.
5. Ensure there is a backup configured on the PC as per the first section of this bulletin.
6. Click "Recover".
7. Select the Backup Job you previously created.
8. Click “Recover” next to the database file you wish to restore.
The system configuration is stored under the IAMain database.
The access logs (who accessed what reader) are stored under the IAAccesslog
Under the IASystemlog are stored any software changes and RTE button activity and the IATALog stores any time and attendance logs
Under the IASystemlog are stored any software changes and RTE button activity and the IATALog stores any time and attendance logs
9. Restart Identity Access and check the data has been restored.
Troubleshooting
Problem:
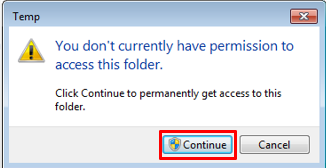
While trying to restore a database, you may encounter an error message which states ‘access to \temp\Key Metric Software is denied’.
Solution:
1. Open File Explorer and navigate to your C:\Windows\Temp folder. Right click on ‘Key Metric Software’ and click onto properties. When navigating to this folder, you may be prompted to click ‘continue’ on a popup window to allow access to this folder.
2. Once in the properties of the ‘Key Metric Software’ folder, click onto the security tab.
3. In the ‘Group or user names’ section, scroll to the group called ‘Users’ and click edit.
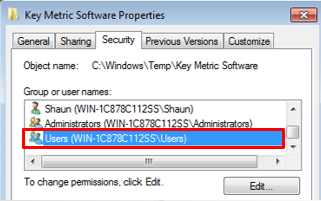
4. A second window will open. Make sure the ‘Users’ group is highlighted blue. In the ‘Permissions for Users’ area, select ‘modify’ in the ‘allow’ column. This will automatically tick everything below modify. After setting the permissions, click ‘Apply’.
5. You will be alerted by a Windows prompt, you need to click ‘Yes’.
6. Now you can click ‘OK’ on the permissions window and ‘OK’ on the properties window and close File explorer.
You now have permission to access the ‘Key Metric Software’ temp folder and will not receive this error preventing you from restoring a database.
Related Articles
Knowledge base 201: Moving Identity Access server to another machine
Checking your Identity Access License When moving Identity Access from one machine to another it is important to check if the current Identity Access server has a Professional or Enterprise license and what version the software is currently running. ...Knowledge base 148: Backing up IA Main SQL Database via a command prompt
The following can be used from CMD to backup a name database on the identity access SQL instance. Run a Windows command prompt and use the commands below: WIndows Authentication : sqlcmd -E -S .\identityaccess -Q "BACKUP DATABASE IAMAIN TO ...Knowledge base 195: Backup Tool in Identity Access 9
This article will explain how to backup and restore the database using the build-in Backup Tool in Identity Access V9 1. Before you can use the Backup Tool from the software, we need to specify the destination of the backup and where we want to store ...Knowledge base 118: MA Sigma Stand alone USB Backup & Restore
It is possible to backup and restore the Users stored in the MA Sigma via the touchscreen display. This is only required when the device is in a stand-alone scenario e.g. Not connected to Identity Access or MorphoManager where you have the ability to ...Knowledge base 113 : Update Existing IA system for a new SQL login.
The following bulletin explains how to change the settings of an existing installation of Identity Access (IA) to allow for new SQL login details. This is based on using IA version 2017.1, if you are not using this version please upgrade by either ...