AccuCampus- How do I restrict appointments ?
INTRO
In AccuCampus there are options to restrict appointment globally and/or to a specific location, in this article we describe how to do it on both cases.
STEP BY STEP
1 - Restrict appointments globally to all locations in the Account:
1.1 - Go to Advanced-Options -> Settings from the main menu:
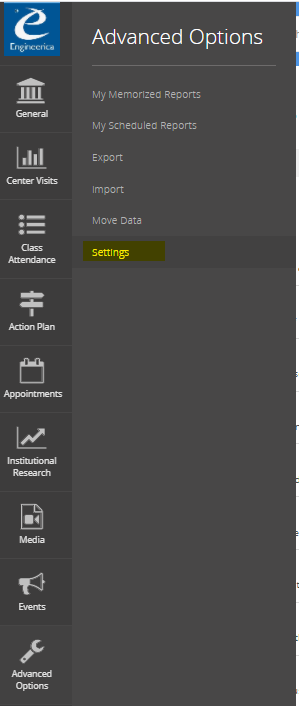
1.2 Select the "Appointments" Menu:
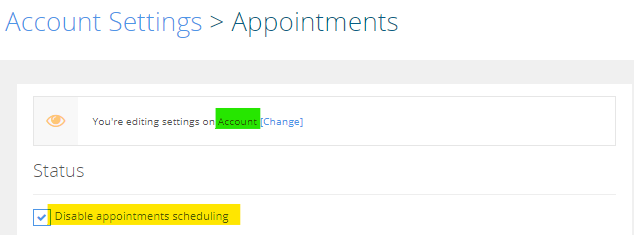
1.3 - Make sure that the scope is set to the Account, for this, it should read "Account" like the highlighted green value below,
now enable the option that says "Disable appointments scheduling" similar to the highlighted option in yellow below:
1.3 - Make sure that the scope is set to the Account, for this, it should read "Account" like the highlighted green value below,
now enable the option that says "Disable appointments scheduling" similar to the highlighted option in yellow below:
1.4 - Scroll down and click Save button:
1.5 - Move to Step 3 at the end of this guide.
2- Restrict Appointments to specific locations within the Account:
2.1 - Go to Advanced-Options-->Settings from the main menu:
2.2 - Select the menu "Appointments":

2.3 - Make sure that the scope is set to the location you want to restrict, if it is not then click the link "Change":
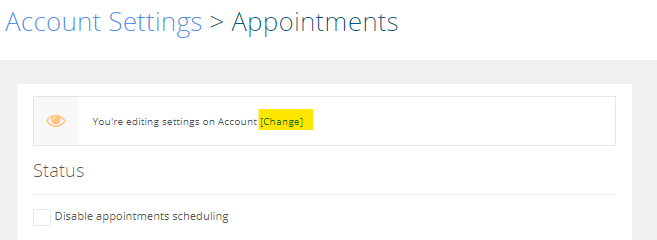
2.4 - Select the right location from the list and click Set Scope, in this example, we are using the A-102 location.
2.3 - Make sure that the scope is set to the location you want to restrict, if it is not then click the link "Change":
2.4 - Select the right location from the list and click Set Scope, in this example, we are using the A-102 location.
2.5 - Make sure that the scope is set properly, highlighted in green you can see the location we selected in the last step, now enable the option highlighted in yellow :
2.6 - Scroll Down and click "Save":

2.7 - Move to Step 3 at the end of this guide.
2.7 - Move to Step 3 at the end of this guide.
3-Restricting the "Appointments" Widget if there is one:
3.1 - The appointment widget has a built-in "new appointment " button which we need to restrict if we want to enforce
our appointment restrictions. For this, we need to remove the widget or change the roles that can view the widget as needed. Go to Advanced-Options -> Settings:
our appointment restrictions. For this, we need to remove the widget or change the roles that can view the widget as needed. Go to Advanced-Options -> Settings:
3.2 - Go to the menu "Home Page Quick Panels":

3.3 - Check your widgets if you have a "My Appointments Widget", if you do then you can either delete it
altogether(by clicking the highlighted in yellow DELETE button as below), or you can click on the widget name
(highlighted in green below) and remove all roles that can view it:
altogether(by clicking the highlighted in yellow DELETE button as below), or you can click on the widget name
(highlighted in green below) and remove all roles that can view it:
3.4 - If editing the widget make sure that only the Administrator role can view it, so nobody can schedule appointments using the widget:
3.5 Make sure to click the Save button to complete this process .
Related Articles
How do I restrict back to back appointments in AccuCampus?
1. Log into AccuCampus. From the Main Sidebar hover over the Advanced Options category. 2. Click on Settings. 3. Click on Appointments. 4. The system defaults to adjusting the appointment settings for all locations. To set the appointment settings ...How do I prevent attendees from scheduling appointments in AccuCampus?
1. From the Main Sidebar, hover over Advanced Options. 2. Click Settings. 3. Click Appointments. 4. Choose the Scope to edit settings for. The default is Account, which controls the global settings for all locations. To change the scope, ...How do I prevent users from voiding appointments in AccuCampus?
1. From the Main Sidebar, hover over Advanced Options. 2. Click Settings. 3. Click Appointments. 4. Choose the Scope to edit settings for. The default is Account, which controls the global settings for all locations. To change the scope, ...How do I prevent students from editing appointments in AccuCampus?
1. From the Main Sidebar, hover over Advanced Options. 2. Click Settings. 3. Click Appointments. 4. Choose the Scope to edit settings for. The default is Account, which controls the global settings for all locations. To change the scope, ...Module 3 - Appointments in AccuCampus
Module 3: Appointments Topic: Appointments Advanced Options > Appointments Settings Staff Availability Making Appointments Reports Available Appointments Within AccuCampus, users are able to create appointments for locations. Each department/entity ...