Web Gateway Installation for AccuTrack
Step 1: Turn on necessary Windows Roles & Features
Windows 7/8/10:
- Go to Control Panel > Programs > Turn Windows features on or off.
- Turn on necessary Windows Features
Windows Server 2012/2016/2019:
- Open Server Manager:
- Select Add Roles & Features:
- Enable the following environment variables to match these screenshots:
- Web Server IIS
- Web Server
- Common HTTP Features
- HTTP Redirection
- Security
- Basic Authentication
- Client Certificate Mapping Authentication
- Digest Authentication
- IIS Client Certificate Mapping Authentication
- Windows Authentication
- Application Development
- .NET Extensibility 4.7
- ASP.NET 4.7
- ISAPI Extensions
- ISAPI Filters
- Server Side Includes
- .NET Framework 4.7 Features
- WCF Services
- TCP Port Sharing
Step 2: Setting the Database Locations
- Go to C:\WebGatewayMVC18\ClientBin. and Run SetDataLocation.exe
- Click on the New button.
- Click No for a Native connection.
- Fill out the Native Database Location information and click Save.
TIP: You can set up multiple local labs by following the steps above for Setting the Database Locations
Step 3: Setting the Email Server Connections
- Go to C:\WebGatewayMVC18\ClientBin and Run GetEmailSettings.exe
- Fill out the email server connection information and Click Save.
NOTE: The email server connection information will be used to email appointment confirmations to students and/or tutors when appointments are scheduled (or canceled) using Web Gateway. - Close out of the application by clicking the X on the upper-right hand corner.
Step 4: Adding the Application to Internet Information Services (IIS)
Step 1: Add a new Application Pool.
Step 2: Fill out the Name and set .NET CLR to Version v4.0.30319. Click OK.
Step 3: Select the application pool, right-click, and choose Advanced Settings.
Step 4: Set Enable 32-bit Applications to True and click OK.
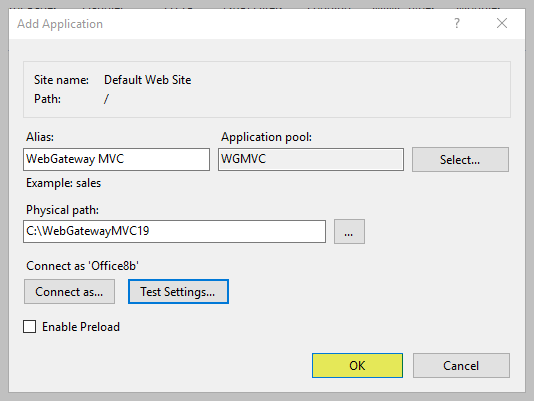
Step 5: Right-click Default Web Site and choose Add Application.
Step 6: Name the Alias, Select the Application Pool that was created, and Set the Physical path to the root folder on which Web Gateway MVC was installed.
Click Test Settings.
- You may get this pop-up after clicking Test Settings so just click Close if everything does not pass correctly.
- Click Connect As...
- Select the Specific User option and click the Set... button.
- Verify that the <domain>\<username> has Read/Write/Modify access to the install folder or the Web Gateway MVC physical path, as well as Read/Write/Modify permissions on the AccuSQL database. Click OK when done.
- You will return to the Add Application window. Click Test Settings once again.
- You should see all green check-marks if they pass the Authentication and Authorization requirements and then simply click Close.
If all is good simply click OK to exit this screen.
Step 7: Select the WebGatewayMVC application and click Browse *:80 (HTTP).
Step 8: Done! Students can begin using Web Gateway!
 Important! This guide does not cover how to host the website to be available online. But at this point, the website should be available on the local network for users to access on-campus. You may need to consult your website development team on how to host an IIS server online or read this Microsoft KB Article:
https://support.microsoft.com/en-us/help/323972/how-to-set-up-your-first-iis-web-site
Related Articles
AccuSQL: Why are my students and tutors not receiving email confirmations when setting up an appointment in Web Gateway?
The main reason this is not occurring is probably that the Email Settings have not been configured on Web Gateway. This is a separate process then what you may have setup in the AccuSQL application itself but can be copied from the Communication > ...AccuSQL - Activities not displaying in Web Gateway when making appointments or when signing in
AccuTrack / AccuSQL - Activities not displaying in Web Gateway when making appointments or when signing in INTRODUCTION Typically, this issue occurs when the imported information is incorrect or if not using scheduled or automated imports then this ...AccuTrack 2020 (Platinum) Installation Instructions
AccuTrack 2020 (Platinum) Installation Instructions 1. Click on the HighTail link that was sent to you. And then click on the Download All button. 2. Click the Save button. 3. Right-click on the downloaded files and Extract all of the files 4. Once ...Web Gateway Installation for AccuSQL
Environment Set Up for Web Gateway Step 1: Turn on necessary Windows Roles & Features Windows 7/8/10: Go to Control Panel > Programs > Turn Windows features on or off. Turn on necessary Windows Features Windows Server 2012/2016/2019: Open Server ...AccuTrack: Upgrading to Web Gateway 2019 and Updating IIS (Internet Information Services)
When you are upgrading from Web Gateway 2018 (or older) to Web Gateway 2019, you will only have to install and setup the new software, as well as make a quick change to IIS on the server hosting the site. Follow the instructions below, and then also ...