Accudemia: How do I setup an import job or export job in Accudemia Data eXchange (ADX) to run whether the user is logged in or not?
INTRODUCTION
The first steps are the same as when you setup any scheduled import or export in Accudemia Date eXchange. To learn more about that process click here. In this article you will learn how to schedule an import job or export job and successfully allow it to run whether you are logged into the computer or not. Typically we recommend that these run on a dedicated Windows-based PC that is always on but the user may not be logged into all the time.
STEP BY STEP
1. To setup a scheduled import/export, once you have created an Import/Export Job in ADX, select the Import/Export Job you want to schedule on the left-side column in ADX and then click on View Details… link on the import job itself in that list.
2. Under the Schedule: section click the Enable link, as shown in the screenshot below. There you will see all the options that are available in your normal view when setting up a Scheduled Task in the Windows Task Scheduler.
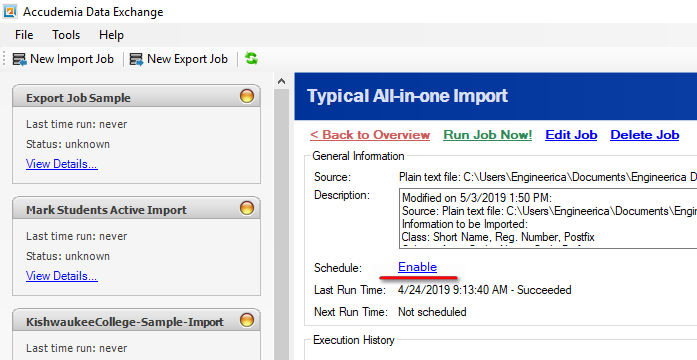
 Note: If you have not allowed Accudemia to remember your Accudemia login credentials then you may be prompted when you click this Enable link.
3. As you can see there's a powerful set of options to choose when the information is imported or exported.
 Warning!
The Security options cannot be configured now.
Typically the ADX application itself does not have the Administrative
permissions needed to approve the security prompt for the password that you would receive so we will set this later in the Task Scheduler directly.
Warning!
The Security options cannot be configured now.
Typically the ADX application itself does not have the Administrative
permissions needed to approve the security prompt for the password that you would receive so we will set this later in the Task Scheduler directly.4. Once you have clicked OK, you will see the summary details on the job details tab.
Now that we've covered the basics we'll show you how to edit the scheduled task of the ADX import job or export job to "Run Whether or Not the User is Logged In"in Windows Task Scheduler.
1. First click on the Start Menu (Windows 7) or Cortana (Windows 10) icon in the lower-left corner of your Windows OS. Now type in the Search field "Task Scheduler" and click the Task Scheduler Desktop App.
2. Once you have this open click on the Task Scheduler Library in the column on the left of the application.
3. You should now see a list of Scheduled Tasks and you'll want to double-click on the one that starts with "Accudemia Data Exchange..." in the list that matches the scheduled time you wanted it to run. Note: You may have to look back at ADX to match this up correctly.
Now that the ADX Scheduled Task properties are open you should be on the first tab labelled "General" and if you look at the bottom of this section you'll want to click on the radio-button that states "Run whether the user is logged on or not." You can also choose a different user account by clicking the Change User or Group button.4. Finally, click OK and it should prompt you to store the user's password in the Windows OS like shown below. Enter the User name and Password and click OK.
All done, great job! Now the scheduled imports should be completely automated and you should not have to worry about these import unless you receive any emails that they have failed to import. This emails will go directly to the Accudemia user logged in when you first open ADX.
Related Articles
Accudemia: What to do if your ADX (Accudemia Data eXchange) does not have your stored import job or export jobs?
Once ADX has been updated, if you open ADX and find the import jobs have disappeared then you can follow this guide to recover them: On the machine where you have ADX currently installed and configured press the Windows Logo key + R to open the ...Accudemia: How do I update ADX?
INTRODUCTION Accudemia Data Exchange (ADX) is the tool we use to run import jobs in Accudemia, sometimes it is necessary to update such a tool. The update process consists of several mandatory steps and one optional (step as needed): Back up in a ...Accudemia: How do I use the Accudemia Data Exchange (ADX)?
Introduction Accudemia comes with a tool called Accudemia Data Exchange (ADX). This tool imports information from CSV files into Accudemia so that widespread changes can be made faster. For example, rather than enrolling each student individually in ...How do I use the Engineerica Data Exchange (ADX) tool to import files in AccuCampus?
This article will explain how to use the Engineerica Data Exchange (ADX) to schedule imports of data into AccuCampus. It is possible to manually import/export data as well. To manually import data, see How do I set up an import to AccuCampus? To ...Accudemia: How do I troubleshoot my scheduled imports/exports?
Introduction This article was created to help discover why a scheduled or automated import/export stopped working in Accudemia. Usually, the error is related to a permission or configuration. For example, sometimes network policies are changed and ...