Data Integration Module (DIM) User Guide
Overview
DIM Features and Definitions
Basic Features
- Automatically downloads Form Data from the Field2Base server
- Provides Transformation of Form Data into a variety of formats (including CSV and SQL) to a backend server
- Provides an easy to learn Project Manager Utility for creating Projects to transform your Form Data
- Provides a comprehensive Administrator Utility for managing the DIM Service and other administrative functions
Advanced Features
- Provides an interface to use conditionals with Form Data transformations in the Project Manager Utility
- Has the ability to process multiple Projects at the same time
- Allows the use of executables and custom code to transform Form Data
DIM Project Manager Utility
DIM Administrator Utility
Definition of a Project
Definition of a Job
- The Data Integration Module is installed on the Company’s backend server
- Allows the use of Executables and Custom Code to transform Form Data
- Access to the Field2Base Service has been granted
- The Company’s backend server has access to the external Internet and can connect to the Field2Base service
- A Project has been setup and is enabled on the Company’s backend server
- Forms in Field2Base have been sent and processed by the server (No Data on the Field2Base server means no Jobs will be created)
- The Data Integration Module will contact the Field2Base Server asking if any Forms have been processed for your Company.
- The Field2Base Server will respond and package Form Data up into Jobs for the Data Integration Module to download.
- The Data Integration Module will download each Job and place it in the queue.
Data Transformation Process Overview
- The first Job in the DIM queue will be opened.
- Based on the settings of the Project for the Job, the Data Transformation will begin by doing the following:
- For CSV Transformations, a new or existing CSV file will be opened
- For SQL Transformations, a connection to the SQL Server will be opened
- For Custom Code and Executable Transformations, the respective command will be run with open access to the Job’s data
- At this point, CSV and SQL Transformations will continue with the rest of the process described while Custom Code and Executable Transformations will process the data in their own fashion.
- For each Region in the Form, the service will take the data in the Job and follow the transformation instructions in the Project and match it up to the proper column in the CSV file or SQL database.
- Once all Regions have been processed, the Project will be checked to see if there are multiple Transformation types. For multiple Transformation types, each Region will be processed again using the new mappings.
- Once all Transformations have been completed, the connection or file is closed.
- Custom Code and Executable Transformations meet back up at this point with CSV and SQL Transforms assuming they were completed successfully.
- The currently running Job is then closed and moved to a Processed folder.
- The next Job in the DIM queue will then be processed.

Project Manager Overview
Menu
- New - allows you to create New Projects from Forms loaded into the Project Manager.
- Open - Allows you to open an existing Project.
- Save - Allows you to save a Project. There is no option to “Save As” because the Project file generation is limited to a single Project per Form and is internal to the Utility. All Project files are saved to C:\Program Files\F2B Data Integration Module\Projects.
- Close - Allows you to close any existing Project without exiting the application.
- Load Forms - Allows you to load Forms for use within the Project Manager.
- Exit - Closes any existing Project and exits the Project Manager.
A. Page Selection and Zoom Options
B. Form Viewing Window
C. Drag and Drop Mapping Button
D. Mapping Window
- Current Mapping - displays what the mapping value (Region Page and Name) is for the selected column. In addition to Regions, text can be added the Current Mapping section with or without Region values in it. For example, a Column in the Output does not have a related Region in the Form and text needs to be there for import into a Company’s Backend system. Any text entered like this is interpreted as a single string with any Region values mapped.
- Mapped Values - displays all of the columns for the Data Transformation Output and the values assigned to each. These values are set by using the Drag and Drop Mapping System.
- Condition Section - this is where a Condition can be set on whether or not a Data Transformation should be outputted. If no conditions are needed, then nothing should be entered here. See the article on Using Conditions in DIM Projects for details how to create a Condition.
E. Data Transformations
CSV - A CSV Data Transformation Type will result in creating an outputted CSV file of Job data processed by the Data Integration Module. The required elements for a CSV Data Transformation Type are:
- Output Path – The Folder Location where the CSV Output file will be placed after being processed by Data Integration Module
- Output Filename – The Filename that the CSV Output file will have
- Number of Columns (if no Column Headers) – The Number of Columns the CSV Output file will have for mapping Regions to
- Column Headers – If Column Headers are Enabled, each line entered here represents a Column in the CSV Output file. When Column Headers are Enabled, the Number of Columns is not required and any value entered there previously is disregarded.
The standard method for Output with CSV Data Transformations is to output to a single file and append additional data to that single file. However, the Data Integration Module does allow Projects to be set up to output individual CSV Output files. See the article on Outputting Per Job CSV Files in DIM Projects for details on how to output individual CSV files for every Job processed.
SQL - A SQL Data Transformation Type will result in performing a SQL Insert into a Company’s Backend Database from the Job data processed by the Data Integration Module. The required elements for a SQL Data Transformation Type are:
- Database Connection String – The standard Connection String to connect to the SQL Database
- Selected Table – The table selected from the Database that will provide the Columns for Mapping
The Database Connection String is derived from the type of SQL Database used on a Company’s Backend Server. See the article on Common Database Connection Strings for the common Database Connection Strings Field2Base has encountered.The standard type of SQL Data Transformation performs an Insert into the SQL Database. The ability to run an Update on Rows already inserted into the SQL Database is available, but requires editing of the Project file outside of the Project Manager. See the article on Creating SQL Update Data Transformations for details on how to add a SQL Update to a Project.Custom Code - A Custom Code Data Transformation Type will run externally written code on the Job data processed by the Data Integration Module. The required elements for a Custom Code Data Transformation Type are:
- Custom Code Location – The Filename and Folder path of the Custom Code that will be run on the Jobs processed
- Selected Class – This the Class that will be used in the Custom Code that contains the proper Interfaces from the Field2Base Data Transformation SDK for use with the Data Integration Module
Executable - An Executable Data Transformation Type will run an external Executable on the Job data processed by the Data Integration Module. The required elements for a Executable Data Transformation Type are:
- Exec Location – The Filename and Folder Path of the Executable that will be run on the Jobs processed
- The remaining elements are all optional.
The Project Manager displays all of the current Data Transformations set up in the Project in the window below the Data Transformation Type Buttons. Selecting the Data Transformation or its Child Objects (i.e. CSV Row or SQL Insert) will allow the User to use the various functions that are available by using the Data Transformation Editing Buttons located underneath the window.
There are four Editing functions available for use with Data Transformations in the Project Manager. These Editing buttons can be used in varying degree with the Data Transformations or their Child Objects.
- New - Creates a Blank Row (for CSV) or Insert (for SQL) on the Selected Data Transformation.
- Edit - Can be used with CSV and Executable Data Transformations. Re-opens the initial Data Transformation Setup window.
- Copy - can be used with Rows (CSV) and Inserts (SQL) [Child Objects Only]. Makes a Copy of the Selected Row or Insert and adds it to the end of the Parent Data Transformation
- Delete - can be used with ALL Data Transformations and Child Objects
F. Details Window
This is the area where details of the Data Transformation are displayed for review. This not an editable box; it is essentially a way to display the expected output for the Transformation you have selected. You do have the option to copy text from this area and paste it elsewhere.
Creating a New Project
Loading eForm Files
The first step when creating a project using the DIM Project Manager is to load the eForm that you need to export data from.
- Open the File Menu of the Project Manager (folder icon in the upper left corner).
- Click on Load Forms.
- A File Browser window will appear and allow you to browse to the folder of your choosing. Select the eForm file(s) you want to load to create DIM projects for.
Creating a New Project
1. Open the F2B Data Integration Module Project Manager. The Project Manager will open with No Project Loaded.2. Go to the File menu and select New.3. The Open Form screen will appear. These are the available eForms that have previously been loaded into your DIM Project Manager as described in the Loading eForms Files section above.4. Select the .eform for your Project and click Open.5. The Initial Transform Type Selection screen will open. Select the appropriate Transformation type and click OK.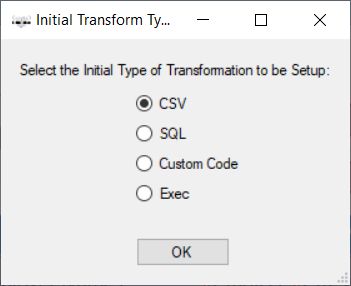 6. Set the path and filename for your output file.7. Specify either the number of columns needed in your output file (with no headers) or enable column headers by checking that option. If you enable column headers, you need to list the headers as shown below.
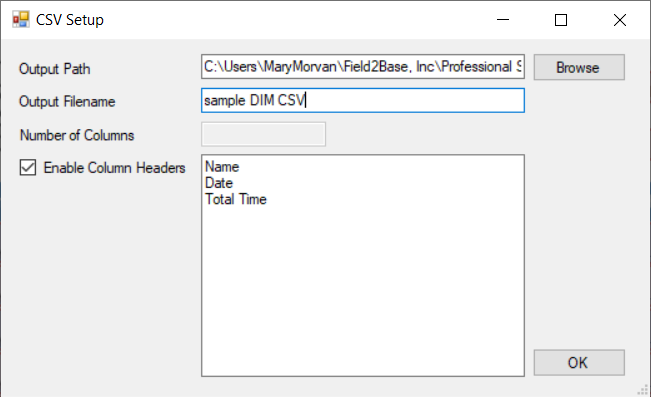
Mapping Values in a Project
- Click on the Row in the Data Transformation Window (A) to display the column names in the Mapped Values (B).
- Select a column in the Mapped Values window (B).
- Select the appropriate Region and drag it to the Drag and Drop Regions Here button (C).
- You will see the expected output in the Details window (D) for your review.
In addition to using the drag and drop functionality, you can also manually enter the following types of values into the Current Mapping field (E).
- Text - For example, “Form sent by ”
- Regions - For example, {Page1@Region1}
- Internal Values - See the article on Keywords Available for DIM Projects for a list of available values
Enabling a Project
Limiting Job Downloads
Auto-Backup of Projects
The DIM Project Manager will automatically backup each version of a Project to a folder in the Field2Base Program Files folder (C:\Program Files\F2B Data Integration Module\Backup). This backup will occur whenever the Project is saved in the DIM Project Manager. The backed up Project will have a filename based on the Date and Timestamp with the following format:
- Go to C:\Program Files\F2B Data Integration Module\Backup.
- Copy the Project (XML file) you want to restore.
- Go to C:\Program Files\F2B Data Integration Module\Projects.
- Paste the Project (XML file) to this folder.
- Delete the prior existing Project for the same Form in order to avoid conflicts.
Testing a Project
The Data Integration Module was created to be a flexible piece of software that works in various back-end scenarios. We cannot provide a standard set of Testing Steps due to the fact every Company’s testing scenario will be different. With that being said, we can detail several testing scenarios to consider.
Testing Scenarios
- All Testing with the Data Integration Module will be done in a Non-Live Testing Backend Environment.
- No additional steps needed for testing
- All Testing with the Data Integration Module will be done in a live Backend Environment AND all Test Data can be Deleted (or can be discarded).
- No additional steps needed for testing
- All Testing with the Data Integration Module will be done in a live Backend Environment BUT all Test Data can NOT be Deleted.
- We recommend that a system to identify Test Data be established before testing begins. For example, use a Test Project Code for all Forms sent in while testing.
Company History Scenarios
- The Company has previously Sent Data for this Form that can be used for Testing with the Data Integration Module.
- Historical Data can be used to test if there are no conflicts with the Testing Environment Scenarios. If there is too much historical data for testing purposes, it is recommended that the Job Downloads are limited. See the article on Limiting Job Downloads Start Date in the DIM Service for details on how to limit the Job Downloads.
- The Company does NOT have previously Sent Data for this Form that can be used for Testing with the Data Integration Module.
- The Form needs to be put into use and be submitted into Field2Base in order for testing to begin.
Creating a Test Version of a Form
If a Company does not feel comfortable with testing the Project with a live Form, a copy of the Form can be created and renamed for testing. This requires access to Forms Designer and adds an additional temporary test Form to the Company’s resources, but it does mean that test data can be easily identified and discarded. Essentially, the Form will be saved with a new unique Form Template ID to create a Test version separate it from the live version. To create a copy of a Form for testing, see the article on How to Clone a Form. We recommend that you add "TEST" to the Form Name in order to differentiate it from the Live version.
- Copy the new TEST eForm to the C:\Program Files\F2B Data Integration Module\Forms folder.
- Open the C:\Program Files\F2B Data Integration Module\Jobs folder.
- Make a copy of the original DIM Project named after the eForm.
- Rename this copied Project to match the Test form name.
- Open this Project in a text editor.
- Paste the new form’s Template ID into the <formTemplateId></formTemplateId> tag, replacing the previous form's ID.
- Make sure that the <enabled> tag is set to True (<enabled>True</enabled>).
- Save the test DIM Project.
- Restart the Data Integration Module Service in the Administrator to begin processing.
Keep in mind, since this is a new Form Template ID, completed TEST forms will need to be submitted in order for the DIM to start processing data.
Testing Task List
- Test the Server Login Info to confirm there are no “Invalid Login” exceptions in the Logs Viewer of the DIM Administrator Utility.
- Test the Job Downloads from the Field2Base server to confirm there are Jobs in the Queue Monitor in the DIM Administrator Utility.
- Test the Jobs processed by the DIM to confirm the Jobs have been completely processed by using the Processed Job Status Filter of the Queue Monitor in the Administrator Utility.
- Test the processed results to confirm data is being outputted. For CSV, this means you need to check the Output folder defined, and for SQL, Executable, and Custom Code, this means you need to check the Database or System where the data was sent.
Using the DIM Administrator
Queue Monitor
Logs Viewer
Service Manager
Popular Articles
Forms Designer Quick Start Guide
Overview Field2Base Forms Designer is the proprietary software application that allows your existing paper forms to be quickly converted to a smart E-form available to your end users via our mobile and web-based Mobile Forms applications. This ...Portal 11.28.2023 Release Notes
Overview Our release notes offer brief descriptions of product enhancements and bug fixes. We include links to the current articles for any affected features. Those articles will be updated shortly after the Portal release to include new ...Integration Service Configuration Guide
How To Configure Integration Services To Allow Read/Write Access on a Network Path All of our Integration Products, including the DIM, DUU, and EDM have respective Windows Services responsible for communicating with our server. Occassionally, ...Data Integration Module (DIM) Migration Guide
Overview This article provides the information necessary to migrate the Field2Base Data Integration Module (DIM) over from one server to another. Please refer to the DIM Install Guide for the initial installation of the Field2Base DIM. Once that's ...How to Check the Version of Integration Products Running on a Windows 10 Machine
Right-click on the Start menu button. Click on Apps & Features. In the Apps & Features search bar type in the Integration Product you are looking for, eg. F2B Data Integration Module, F2B Data Upload, or F2B Enterprise Dispatch Module. Click to ...