2015+ Grand Cherokee HVAC Climate Control Swap

When you upgrade to the "UAV" Uconnect system you may notice the lower climate control auxiliary buttons may be a bit different. In this quick guide we will show you how to swap your climate control set from your factory installed 8.4-inch radio bezel to the new UAV 8.4-inch radio bezel.

Step 1: Find a clean & soft surface to lay your Jeep's factory radio bezel face down. Locate the black plastic housing on the lower portion of the radio bezel. Remove (10) Torx T8 screws (6 around the perimeter and 4 in the center). Pull off the climate control housing.

Step 2: Remove (8) Torx T8 screws around the perimeter of the circuit boards.

Step 3: Carefully pull both circuit boards away from the plastic housing. You will notice a few clips around the perimeter that need to be depressed to release the circuit boards. (You just need to gain access to 4 remaining screws which is beneath the lower circuit board)
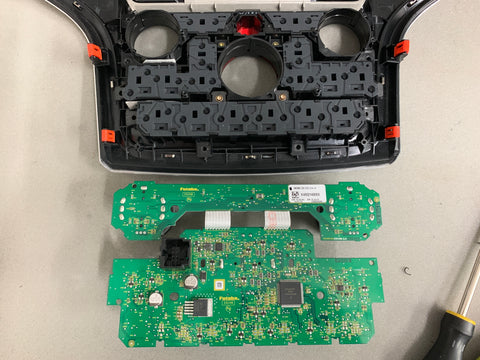
Step 4: Remove (4) Torx T8 screws. Then pull away the 3 remaining components from the radio bezel.

Step 5: Follow steps 1 through 4 on the UAV 8.4-inch radio bezel received by Infotainment.com.
Step 6: Install the middle component on the UAV radio bezel first. Insert it at an angle to allow the bottom portion to tuck behind the lower screw holes.

Step 7: Install the upper and lower components and install (4) Torx T8 screws. Make sure the backside of all 3 components are fit into place and the rubber parts laid flush.

Step 8: Install the two circuit boards and snap into place. Install (8) Torx T8 screws around the perimeter.

Step 9: Place the climate control housing over the circuit boards. You may have to slightly bend the bezel a tad to get the housing to secure into place. Install the remaining (10) Torx T8 screws. Done!

Related Articles
Volume Bezel Wiring Swap
Here is a video showing how to swap the wiring from one volume bezel over to the new one. https://workdrive.zohoexternal.com/file/imu0a72120d7491ac4198a711a39124d3db69Can't control climate on 8.4 Jeep Wrangler screen upgrade
After installing an 8.4 inch screen upgrade, if you've noticed that you can control your climate on the hard knobs but not the touchscreen, it's because your stock climate control is analog. To fix this you'll need to upgrade to a digital climate ...Q: I installed the C-ACC-LD OBD Genie programmer in my 2011-2014 Chrysler 300 / Dodge Charger to enable AUTO temperature control and it's not working.
Q: I installed the C-ACC-LD OBD Genie programmer in my 2011-2014 Chrysler 300 / Dodge Charger to enable AUTO temperature control and it's not working. A: If the programmer's embedded LED turned green then the vehicle's computer has been programmed. ...Climate control icon not showing in my Sync 3 upgrade for Ford F-150 or SuperDuty
The climate screen doesn't show in this upgrade due to these vehicles not having automatic climate control, but manual.CLIMATE CONTROL ALWAYS SHOWS 72 OR 27 DEGREES
when upgrading to the RB5 or RE2 if you did not have the auto climate control button on your original bezel the temp will display on the screen either 72 or 27 degrees all the time. however you are still able to turn the temperature up and down with ...