How to bulk import your music catalog into Magnetracks
Magnetracks gives you a straightforward way to get all your audio files and metadata into Magnetracks. This is a three step process that involves first uploading the metadata for your tracks, and secondly uploading all the associated audio files to an FTP location.
Step 1: Preparing your metadata

Step 2: Preparing your audio files

(click image to enlarge)
Step 3: Bulk uploading your audio files
Watch this video for an overview of the process, then follow our step-by-step directions below for more detailed instructions.
FUTURE_VIDEO_GOES_HERE
Step 1: Preparing your metadata
READ THIS FIRST: Important Tips for getting your metadata ready for import
Unlike other types of records you import into Magnetracks, track metadata has to be properly linked to files as they're imported. To accomplish this, you'll notice a special field in the data template for tracks called "Original File Name".
IMPORTANT: For each line in your metadata that has audio files to import, you'll need to have a value for the Original File Name field. Otherwise, that record will not import.
Since every track is part of an album/project and every album/project is part of a catalog, it's a good idea to have these records in place first (or import them). However, if you haven't, Magnetracks will auto-create them as it imports your tracks if it can't find them.
Step 2: Preparing your audio files
In the screenshot in step 1, "My_Amazing_Song" will be the root file name for all available versions of that track, regardless of file format. Magnetracks will match the file that you upload to the FTP Import site if it starts with "My_Amazing_Song".
Q: "But what if I have multiple versions of that track?
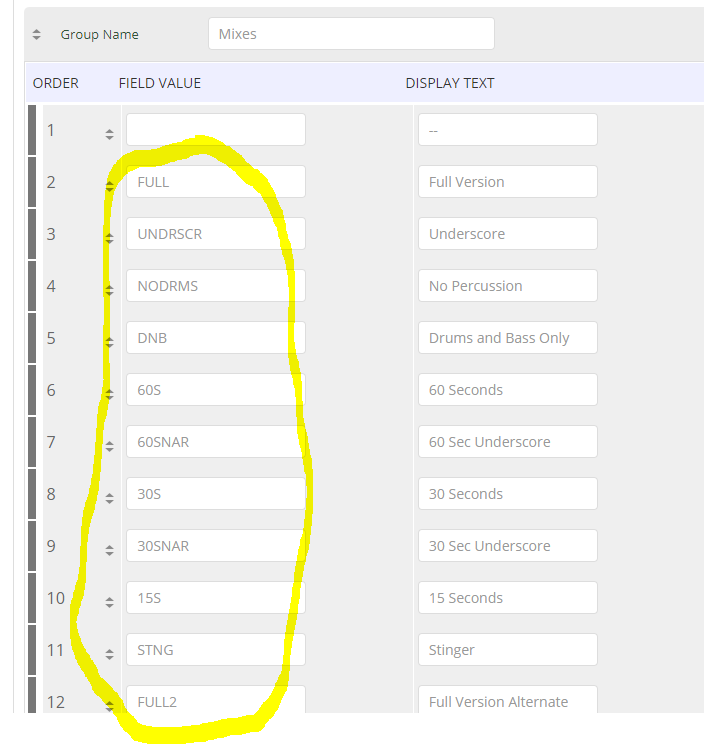
A: If you have alternate versions, edit lengths, stems or different file formats available, they must be named to match the types listed in the Versions Option Set in Magnetracks. This list is totally customized by you when you visit the Option Lists area, and select the "Versions" option list.
Here is a partial screenshot of the default versions available to you:
You simply add the appropriate suffix shown in the Field Value column to your source file names, that match what type of alt mix or stem it actually is. If you don't see one that is suitable for that file, add it to the Versions option list first. Finished file names should match the format: FILENAME_VERSION.FILEFORMAT (ie: My_Amazing_Song_30s.wav).
EXAMPLES OF GOOD FILE NAMES:
1. My_Amazing_Song_FULL.wav
2. My_Amazing_Song_30s.mp3
3. My_Amazing_Song_NODRUMS.wav
4. My_Amazing_Song.AIF
5. My_Amazing_Song_UNDRSCR.wav
6. MY_AMAZING_SONG.mp3
Here are a few examples of tracks that WILL NOT successfully import (the problem is shown in brackets).
EXAMPLES OF BAD FILE NAMES (WILL NOT IMPORT):
1. My Amazing Song_FULL.aif (name formatting inconsistent with metadata - underscores missing)
1. My_Amazing_Song.aif (the mix version type is missing)
3. My_Amazing_Song_FULL (where's the file extension?)
NOTE: File names are not case-sensitive, so don't worry about upper-case, lower-case issues!
Step 3: Bulk uploading your audio files
Magnetracks offers an FTP site just for you to upload any audio files you'd like us to injest. Every 15 minutes, the site is scanned for new files to import. The FTP site is located at: ftp.magnetracks.com/IMPORTS. You will be prompted for a login.
This can be obtained by visiting SETTINGS > Login Preferences, and clicking the button near the bottom of the page labelled, "Email my login".
After you've imported the metadata in Step #1 and have finished naming all your files according to Step #2 (above), you can use an FTP client such as FileZilla (https://filezilla-project.org/) to transfer all of your audio files at once into the /IMPORTS folder.
Related Articles
Video Tutorial: Creating a new Album/Project in Magnetracks
Video Tutorial: Connecting Magnetracks and Soundcloud
Video Tutorial: Modify your Magnetracks Dashboard
Video Tutorial: Manage your Magnetracks Notifications
What do I need to know before distributing my music through DashGo?
When you enable the DashGo app and are ready to distributing music through all the streaming services it connects you to, there are a few things that must be in place FIRST. 1. You must be the authorized administrator of the works you're releasing - ...