Beta Release: New Select Parts to Order Page
Search Filters
- Select multiple options from each drop down menu
- Click Search when finished, or simply click off of the menu; results auto-load based on selections.
- View current search filters
- Click the X to clear a filter
Add a New Product
- New Product menu
- Quick Add Product: Add a new part with abbreviated product info including part number, category, and pricing.
- New Product: Add a new product from full part details page with all available product fields.
- Main Actions menu
- Import/Update: Import new products or update existing using a csv file/spreadsheet.
- Export: Export current search results to a csv file/spreadsheet
- Print Inventory List: Print current search results in a format useful for a manual physical inventory count.
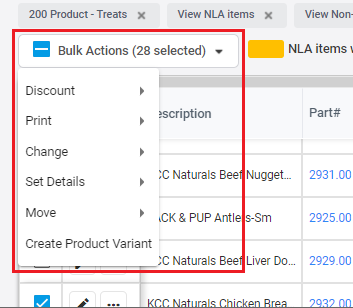
- Bulk Actions menu: applies action to all selected products
- Discount
- Set Discount: Set a percentage discount for all selected items
- Remove Discount: Remove a percentage discount for all selected items
- Set on Sale: Use the Sale price code for all selected items
- Remove from Sale: Return all selected items to Retail price
- Apply BOGO: Set a buy one get one deal for each selected items (BOGO does not support “mix and match”)
- Turn off BOGO: Remove the buy one get one deal for all selected items
- Print
- Print Standard Labels (2.5x1 inch labels) for quantity in stock for each selected item
- Print Sheet Labels for quantity in stock for each selected item
- Change
- Change Manufacturer: Move all selected items to a different manufacturer
- Change Category: Move all selected items to a different category
- Change Vendor: Move all selected items to a different default vendor
- Set Details
- Set Solicit Serial Number: Turn on the solicit serial number option for all selected products
- Set Serial Number Control Enforced: Turn on the serial number control enforced option for all selected products
- Turn ON Service Flag: Turn the “warranty” (service) reminder option for all selected products
- Move
- Delete/Archive: Moves all selected products out of active inventory to archived status
- Mark as NLA: Moves all selected products to No Longer Available status (will archive if no quantity in stock)
- Mark as Reactivate: Moves all selected products back to active inventory
- Move to Rental: Removes selected parts from Products and changes to Rental inventory type
- Move to Service: Removes selected parts from Products and changes to Service inventory type
- Create Product Variant
- Creates a product variant for online sales, for all selected products
View and Edit Column Display
- Columns menu
- Edit columns to view
- Select which columns you prefer to have in your default view:
- Move the column order by dragging and dropping:
Search Results View Options
- Change the search results view
- Standard: default Manage Products column view
- Update Wizard: allows in-line editing of many search results fields including Quantity in Stock
- Storefront: changes bulk action menu options and filter options to online store relevant
- Save your custom preferences
Add Items to Order Cart
- Click the green "Add to cart" button to add all selected items to their various vendor order carts
- The cart screen will appear, with added items to the left and all active vendor carts to the right. Click any cart to finish an order, or click "Continue selecting parts."
- View Details: View the product details page
- Create Purchase Order: Add the item to an existing open purchase order or edit vendor details
- Quick Order Part: Edit cost or default vendor for a single item prior to adding it to the cart
Viewing Cart Details and Completing an Order
When you select a specific cart, you will see all of its included items. You can choose to complete the order ("Create Purchase Order" or you can go back to selecting more items.
Products with multiple vendors will be added to all optional vendor carts. Once one order is complete, these items will drop from the alternate vendors' carts.
- Click the Columns option to select and arrange the displayed columns
Related Articles
Beta Release: New Create Purchase Order Page
Once items are added to your vendor carts, you can proceed with completing the order. All vendors with open carts will display in Office > Purchase Orders > Create Purchase Orders (items are added to the carts via the Select Parts to Order page). ...
Q2S7.24 Release Notes - Orchid POS/eComm™
Q2S7.24 Release Notes This program, printed documentation and documents should not be used as a substitute for professional advice in specific situations. The procedures, images and examples in this document are for illustrative purposes only and may ...
Beta Release: New Manage Products Page
The new Manage Products page comes with not just a new look, but major functionality updates including the ability to select which columns display by default and in what order. All features and available actions defined below. The most obvious change ...
Q1S5.24 Release Notes- Orchid POS/eComm™
Q1S5.24 Release Notes This program, printed documentation and documents should not be used as a substitute for professional advice in specific situations. The procedures, images and examples in this document are for illustrative purposes only and may ...
Q1S9.24 Release Notes- Orchid POS/eComm™
Q1S9.24 Release Notes This program, printed documentation and documents should not be used as a substitute for professional advice in specific situations. The procedures, images and examples in this document are for illustrative purposes only and may ...