How to Configure your Zoho Mail Account as IMAP in iPhone/ iPad
Configure your Zoho Mail Account as IMAP in iPhone/ iPad
- Ensure that IMAP Access is turned on for your account. (Login to Zoho Mail >> Settings >> POP/ IMAP >> Enable IMAP). (Ignore step 1 above, as is already done by us)
- In your iPhone, Tap Settings >> Mail, Contacts and Calendar >> Add Account and choose Other.

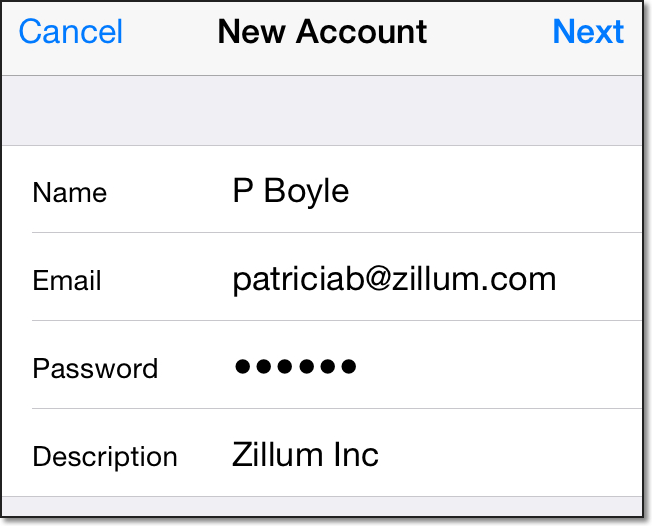
- Provide your Name, Email Address, Password and a short description to the account. Tap Next
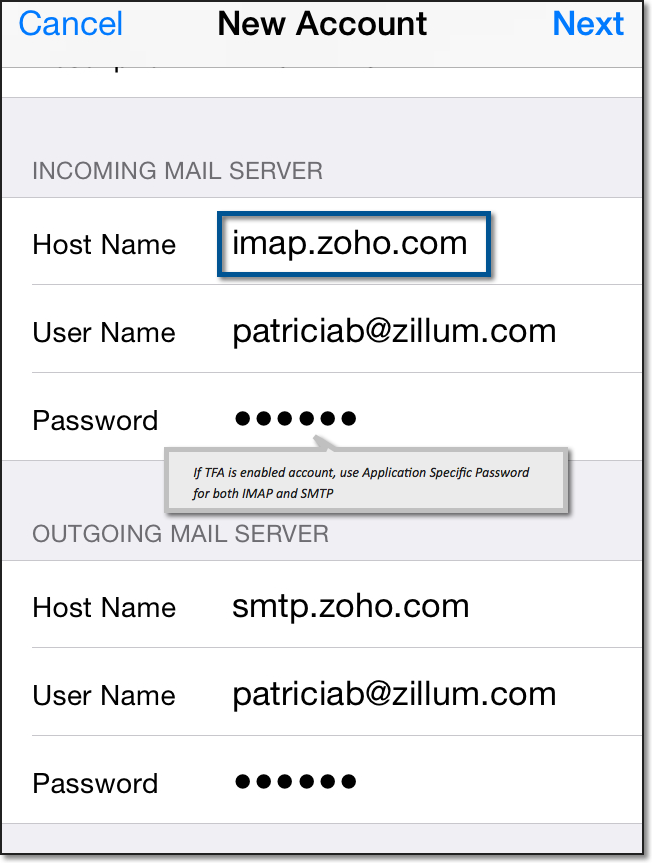
- If Two Factor Authentication is enabled for your account, provide Application Specific Password to configure the account.
- In the next screen, ensure that IMAP is selected in the top for account type. To configure your account as POP in your iPhone, refer here for configuration details to be used.
- In the Incoming Mail Server section, provide the details below.
- Hostname : imap.zoho.com
- Username : Your Zoho Email Address
- Password : Your account password. (You may require Application Specific password to set up the account in other devices if Two Factor Authentication is enabled for your account)
- In the Outgoing Mail Server section, provide the details below
- Hostname : smtp.zoho.com
- Username : Your Zoho account email address (user@yourdomain.com)
- Password : Your Zoho Password (You may require Application Specific password to set up the account in other devices if Two Factor Authentication is enabled for your account)
- The device connects to the IMAP server and authenticates the credentials provided by you. On successful authentication, the IMAP account is set up on your mobile device.
- In case you are unable to connect to the IMAP server imap.zoho.com, you may check the Advanced settings of the Incoming Server. Tap iPhone Settings >> Mail, Calendar and Contacts >> Tap the account
- Scroll down and Tap Advanced
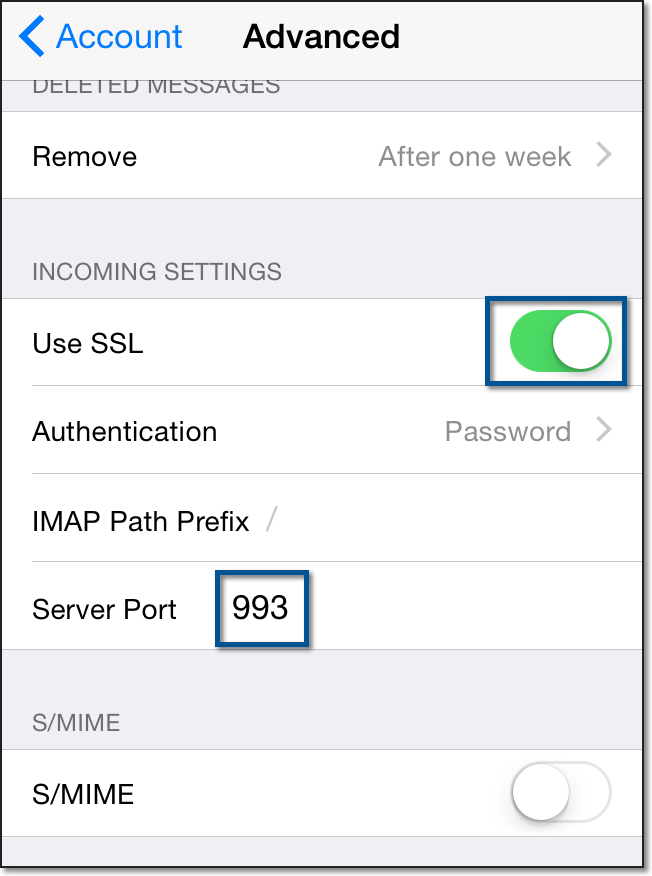
- Make sure that Use SSL is turned on and the port number is 993.
- iPhone Settings >> Mail, Calendar and Contacts >> Select the account configured
- Check if you have provided the email address without any typos.
- The email address mentioned should be either the main email address or email alias of the account being configured.
- iPhone Settings >> Mail, Calendar and Contacts >> Select the account configured
- Scroll down and select "SMTP" to check the SSL and Port details

- Ensure that Use SSL is turned on and the SMTP port is set to 465.
Troubleshooting IMAP Configuration in iPhone
Incoming Emails not getting synced:
Outgoing emails:
Error Message: Relaying Disallowed
Error Message: Unable to send message. Cannot connect to smtp.zoho.com
Related Articles
How to setup Outlook to work with Zoho mail
How to setup Outlook to work with Zoho mail 1. After successfully logging into zoho mail follow the steps below Step 1 – Click on the icon . Step 2 – Click on settings. Step 3 – Scroll down until you locate “Mail accounts”. Step 4 – Click ...How to edit Employee Bank Account | ARUTI
The following steps will help you edit Employee Bank Account in Aruti. Kindly follow the steps shown in the screenshot below Step 1 Login in to Aruti and click on Payroll as shown in the screenshot below: Step 2 Select the employee's bank account ...How to create Employee Bank Account | ARUTI
To create Employee Bank Account in Aruti, follow the Steps below. Step 1 Login in to Aruti and click on Payroll as shown in the screenshot below: Step 2 Click on the New button and fill it out as shown in the screenshot below:Sample chart of account for microfinance
Please find below list of recommended accounts/ledger for a microfinance company. This is a sample for reference 10000 -- ASSETS 11000 -- Cash and bank balances 11100 -- Petty Cash Accounts 11101 -- Cash 1 11102 -- Cash 2 11200 -- Bank Balances 11201 ...How to e-mail Payslip to Selected or All Empoyees in Aruti
From the main Aruti Application, kindly follow the steps below to send payslips via email to selected or all employees in Aruti. Step 1. Go to Utilities Click on Mail Box Click on Write Message Click on To and select Employee Payslip Search and ...