Metered Billing - Usage Invoicing
The metered billing plugin is used to generate usage invoices from services that support this type of billing. Currently the plugin only supports Netsapiens and Brightlink PBX Cloud instances, but future improvements have been planned to allow importing call records or usage items from flat files. Check out our roadmap for more information on future improvements or to suggest your own: https://roadmap.quotingbill.io/

To use this plugin, you should already have installed and setup a switch integration via the marketplace. From her on these may be referred to as Metered Sources. Supported metered sources are:
- Netsapiens: See integration guide here.
- Brightlink PBX Cloud: See integration guide here.
How it works
The Metered Billing Application allows you to bill usage using Call Rates and offer usage allowances through Calling Plans that can be offered to your customers along with their subscription services. Using recognized metered sources you can retrieve call records and apply rates to your customers existing subscriptions and services. You'll need to create the customers and configure the necessary settings for each metered source before you begin. You can do this by visiting the Customer's Profile and opening the tabs for each supported metered source (Example: Netsapiens and Brightlink PBX Cloud require customers to have a domain set in order to retrieve call records).
Syncing Phone Numbers and Call Records
Phone numbers and call records are automatically synced for a customer, when their subscription is processed for their recurring payment. The usage for the previous month will be included in their recurring invoice listed by each call type category as a sum.
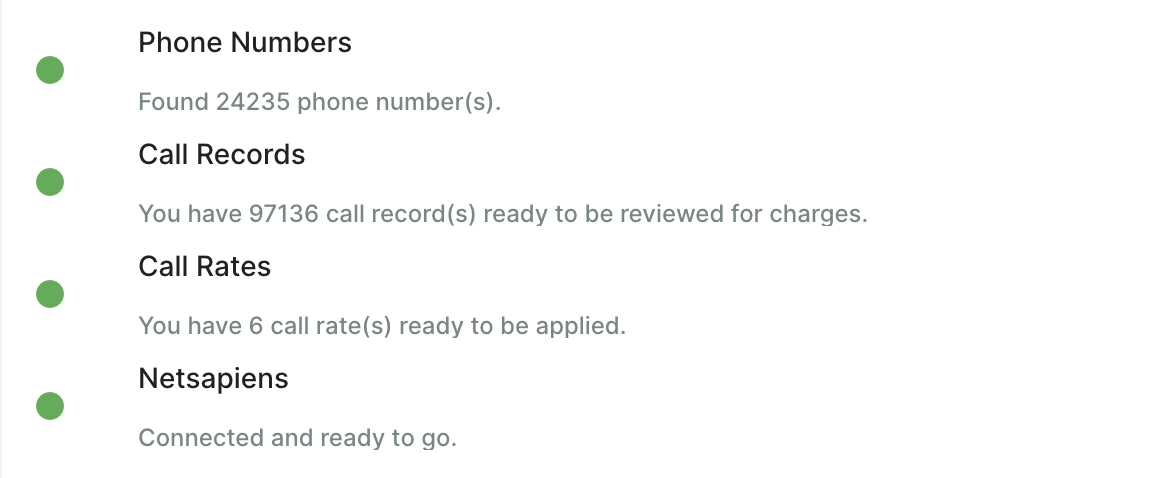
To Manually sync a customers call records, visit the Customer Profile and open the Metered Billing tab. Here you should see a connectivity summary, correct any errors for each metered source if necessary. When all checks are green, click 'Sync
Phone Numbers & Call Records' and select the appropriate date rate from the options dialog. Progress for call record sync is reported in Metered Billing -> Call Details and Metered Billing -> Billing.

The customer must be configured for the Meter to sync! Check Customer Profile -> Metered Billing for more information

The call details are currently not available to be included on the invoice, but for troubleshooting purposes, you can review the call records and rates applied in Metered Billing -> Call Details.
Setting up your Meter
In order to generate a complete invoice for your customers we'll need a few things:
- Call Rates: These are the rates that will be used to charge your customers. More information on how to set those up here
- Call Records: These are the calls that will be billed, they are pulled from known sources automatically daily and can be pulled for individual customers from the customer profile in the Metered Billing Tab.
- An Active Switch:
- Netsapiens: The status of your Netsapiens integration (if installed)
- Brightlink: The status of your Brightlink integration (if installed)
Generating an Invoice
Once all the necessary configurations have been met, you'll be ready to create your first invoice with usage.
Automatic usage invoicing:
If the customer has been set up for a metered source and has an active recurring subscription, when the subscription is processed for payment on their billing date, the system will sync the previous month's call records and generate charges based on the current rates configured. If changes need to be made, the invoice can be deleted and regenerated using manual process.
Manual usage invoicing:
If you are billing an exsting customer you may want to include some existing usage that might extend past the previous month. You might also want to correct an invoice that was automatically generated. We can manually generate an invoice in response to both of these situations. First make sure the customer is properly set up on each installed metered source, and retrieve records using their customer profile.
- Go to Apps -> Metered Billing -> Billing, and wait for any call retrieval jobs to finish processing, failing to do so may result in call records missing from the invoice. This may take some time depending on the number of call records a customer may generate.
- Select a customer, the call types you want to include in the invoice ( Leave Blank for all types), and a date range to process.
- Click Search, this will generate a summary (this will check for rates, as well as connectivity to your metered source), and call records found.
- Click 'Create Invoice' to create the invoice based on the previous criteria, (If there are not rates or call records found, this button will be disabled).
After getting a preview of what will be reviewed for charges, you can click on the Create Invoice button below the results. This will generate an invoice that can be modified before finally sending out to the customer.
Troubleshooting
There may be a few reasons for not seeing the usage charges you were expecting, below are a few things to check before ringing the support bell:
- Has the customer been setup for the metered source?
The customer should already exist. Check the customer profile, and click on each metered source. (Example: Netsapiens and Brightlink PBX Cloud require that a customer have a domain. We use this to pull the call records from the switch). - Have you setup default rates?
Check your rate deck. If you don't have a rate defined for a call type, it will not generate charges. Also, consider if the customer has a calling plan that covers the usage generated, there will not be any visible charges. Consider having a catch-all rate for each call type. Click here for more information on setting up Call Rates. - Does the customer have call records?
If you don't see any call records for the customer, open the Customer Profile and on each metered source click 'Sync Phone Numbers & Call Records' and select the appropriate date rate from the options dialog. - Has the usage already been billed?
This one might be a little obvious but it doesn't hurt to check, once charges have been applied to call, it cannot be billed again. If you wish to change the pricing, you must delete the original invoice the call is included on and regenerate the invoice Manually using the appropriate date range. The invoice a call was billed on can be found in Metered Billing -> Call Details page, use the filters to locate call records by customer.
If you want to be up to date with what the QuotingBill community is suggesting for our product, or even suggesting something yourself that you don't see here, please visit our roadmap page here https://roadmap.quotingbill.io/
Related Articles
Metered Billing - Call Rates & Calling Plans
This article will provide an overview on how to configure Call Rates and Calling Plans in the Metered Billing plugin. For more information on how to generate a usage invoice or how to setup your switch for usage billing, please refer to Metered ...QuotingBill - General Settings (Payments, Billing and Accounting)
Payment Settings By using this functionality, you will be able to choose your preferred payment gateway app and assign it to a specific payment method. You will have to access your profile and go to the general settings. Notice that you will see all ...Marketplace - Brightlink PBXCloud
This plugin will provide you with additional recipes for projects that will assist in setting up customers on your brightlink instance and some new settings for your customers profiles. Additionally, this plugin works with MeteredBilling to provide ...Marketplace - Netsapiens
This plugin will provide you with additional recipes for projects that will assist in setting up customers on your netsapiens instance and some new settings for your customers profiles. Additionally, this plugin works with MeteredBilling to provide ...QuotingBill - Facing Portal
When creating a customer, you automatically add a main contact which will be assigned as the owner. However, you can add more contacts through the customer menu options and grant them permissions to access the portal and make payments. If you need to ...