How to Use Guide: District and School Administrators (Updated 07.21.23)
How to Use Guide: District and School Administrators
Getting to Success Involves Active Hands On
About This Guide
This guide has been written for district and school administrators (DAs and SAs) who purchase, roster or support self-registration, implement, and troubleshoot Sirius Online programs. The guide serves to underscore how to take advantage of opportunities for:
User management and look up within Sirius Online
Access to Sirius Programs for DAs and SA’s involved in academic administration
Updates and news concerning current reporting within Sirius Online
Sirius Online User Experience: Administrators (Video: 22:35) - New Updates Are in the Works!
Sirius Online Checklist for Administrators
Upon review and hands-on experience with the topics included in this How to Use Guide, District and School Administrators will be able to perform the following functions within each major interface/user experience tab.
Upon review and hands on practice, participants will be able to:
GENERAL INTERFACE (Schools Landing Page)
Recognize and access major functions within the main administrator dashboard
View parallel opportunities for filtered access by school in individual school cards.
View/Navigate tools and functions for schools in which Sirius has been licensed.
Select to work at either the District or School Level (District Admins Only)
SUPPORT TAB | NOTIFICATIONS ICON | PROFILE ICON
Get technical support quickly and easily from the Sirius Customer Care team, allowing you to quickly recover from any online technical challenges that you might face as you facilitate learning and growth in your students.
Access important notifications and news about Sirius Online, including monthly release notes.
Manage a limited set of profile attributes, access core policy documents, and log out of Sirius Online.
USERS, CLASSES, AND CONTENT TABS
Navigate User Identities at the District or School level based on specific role.
Look up active vs. deactivated user identities
Create new user identities at Self Registration Districts
Look up shared or registered classes in Sirius
Access and support classes using “Make Me a Co-teacher” functionality
Create pullout or breakout classes at rostered districts and schools based on currently active teacher and student identities
Support teachers and students using Sirius Online curriculum, including access to courses, course contents, and assignment “Scorecard” data by activities done at the class level
REPORTS TAB
Course Report - View and analyze performance, usage, and engagement by course.
Standards Report - View and analyze performance, usage, and progress by standard or TEKS.
Getting Started
Sirius Online User Experience: Administrators (Video: 22:35) - Updates Coming Soon
Self Registration of District and School Administrators
Most Sirius Districts and Schools handle Single Sign On (SSO) and class rosters for teachers and students via Clever, ClassLink, One Roster, or an LTI-compatible LMS.
However, many districts do not provide SSO or account credentials for all District and School Administrators through the same methods or based on the same datasets.
Regardless of the method districts use for rostering teachers and students, DAs and SAs can self-register for Sirius Online accounts no matter the method if they are not currently being shared by your district directly with Sirius through Clever, ClassLink, EdLink, or another method.
For more on how to Self-Registration, please see Section 4 of theSystem Requirements and Rostering in Sirius Online (Formerly Getting Started Guide).
Note: If you do not have District or School Administrator Access Codes, contact the SES Online team at (800) 942-1379, Option 2, or create a ticket at our Online Support Center requesting your district or school’s administrator access codes.
Logging In
For DAs and SAs who are automatically provisioned and SSO into their accounts: please access Sirius Online via that method.
For self-registered administrators, please log in with your Username and Password at https://sirius.contect2classroom.com.
1. GENERAL INTERFACE: District and School Administrator Dashboard (Schools Landing Page)
The District or School Administrator Dashboard has essentially the same structure: DAs have access to the district organization and all provisioned schools within the district, while SAs have access to only the schools to which they are assigned (building-wise).
Note for DA’s: If you access Users, Products, Classes and Reports from each “School/Building card” in the main section of the screen will allow you access to all the schools and their aggregate data within your district. You will be able to drill down into each school, teachers, and their classes reports to the student level.

Schools Tab and Card. Navigation in the main menu defaults to the district and schools to which the DA or SA has access in the Schools tab. DA’s can see different schools, whereas SA’s land automatically in their one school building (one building vs. multiple buildings which DAs can view and access).
Users Tab and Link: Self registration districts and schools are granted access to our user management system where they can directly set up and manage who has access to Sirius, especially if they want to register teachers, create classes, or add pre-existing or new students on their behalf; we allow rostered schools to have read-only access to user records as a check for success in initial or nightly data syncs when significant updates to data need to be reflected in Sirius.
Content Tab and Link: All DAs and SAs, regardless of how they are provisioned into Sirius, can access the products/courses that your district or building has purchased in the Contents tab. Often this is the place where academic administrators who do not teach classes go to review program lessons and assessments.
Classes Tab and Link: The Classes tab allows DAs and SAs to access classes and class-related information such as rosters. Self registration DAs and SAs can also locate students in classes or through filtered search.
Reports Tab or Link. All DAs and SAs will be able to access both Course and Standards reports for the schools to which they are assigned. Administrators can drill into data by School, Teacher/Class, and Student performance and usage reports within both the Course (scope and sequence) and by Standards performance and usage.
Support Tab. Provides access to our Sirius Online Support Center which includes a Support - Knowledge Base (home to this current article), Educator Community access for discussion boards focused on successful implementation and best practices, and Tickets for reporting technical support issues that cannot be addressed or resolved within a district’s IT Tech Support group.
Notifications. The number appearing in the dark blue circle indicates notifications from the Sirius Online team that you should view whenever new notifications are added.
Profile Icon. Contains the ability to manage or use one’s Profile, Switch Role (when administrators are teachers or have made themselves co-teachers), Feedback, Copyright Notice, Terms of Use, Privacy Policy, and Log Out.
A Special Note About Video Tutorials Referenced in This Document
The referenced videos in this document are labeled as firewall-friendly and will work within your firewall as long as your IT department has ‘whitelisted’ our main URL. If you are not able to view them, we recommend you use a computer on a different network or your phone to view the streaming-friendly/YouTube video clips for optimal playback.
We also present the full YouTube Playlist of videos. Please share the link with your colleagues, co-teachers, and tutor staff, and encourage them to go ‘hands-on’ with Sirius Online immediately after viewing.
2. SUPPORT TAB | NOTIFICATIONS | PROFILE ICON: Getting Support and Getting Set Up - VIDEO 1
Firewall-friendly Video Clip: https://api.content2classroom.com/api/publicRedirectToResource?contentItemId=6BA6B8B61DAF46D7A629C1B384F02F3B
Streaming-friendly/YouTube Video Clip: https://youtu.be/Us6YHI98Omw
Support
If you need access to support resources, click the Support tab in the top right of your screen when you log in..
You’ll navigate to a support landing page that allows access to online support resources in our Knowledge Base, participate in our online educator Community, or create a ticket if you need technical support from our customer care team.
You can also submit a ticket for technical or customer support directly by emailing support@siriuseducationsolutions.com.
Contact Information
Toll Free Voice: 800-942-1379 (#2 - Tech Support)
Toll Free Fax: 844-329-0913
Tech Support Email to Ticket: support@siriuseducationsolution.com
Chat: Available at www.siriuseducationsolutions.com
Create a Ticket
Create a Tech Support ticket by clicking the Ticket Icon on the main Support landing page and then choosing Online Technical Support.
By Phone
You can contact the SES Online team at (800) 942-1379, Option 2.
By Email
Please send any technical support issues to our email address: support@siriuseducationsolution.zohodesk.com
Other Inquiries
For other inquiries, please make your inquiry via other types of tickets or by calling our (800) 942-1379 and selecting the option that best applies.
Notifications
Notifications can be found in the upper right corner in the circle icon with a number inside. The number represents the notifications that are currently active. When you see the number in the icon change, you should review current notifications, as they pertain to new releases or any other urgent announcements or information about your use of the Sirius Online Platform.
Managing Your Profile
Your profile icon profile can be found in the upper right corner of the screen.
Click the profile icon to expose the pulldown menu.
Then click Profile.
If you’re self-registered, you’ll be able to update a limited amount of information, including your password and profile icon.
If your school does rosters for you, you’ll be able to change only your profile icon.
You can log out from the account profile icon.
3. USERS, CLASSES, and CONTENT Tabs
USERS TAB and User Identity Management
Locating Users
At rostered districts, user identity management is ‘read-only.’ At self registration districts, you have the power to create, edit, and disable accounts and classes as needed.
Note: Within user record fields, those with a white background are editable; fields that are shaded do not allow for edits or updates as you roster user data from outside the system through nightly sync.
When in a district or school users screen, you’ll see a summary view of all users, active and inactive. You can navigate from page to page to examine the records, or you can use the funnel filter mechanism in the header of each column to filter for specific data or attributes.

To filter for better matching results, click the filters you’d like to use as you narrow your search. In the example below, we’ll filter for the last name “Roberts” by clicking the funnel to the right of the last name column header.

Next we select the best Boolean or logical operator that suits our search criteria (We’ll use “Is equal to” in our example).

Type in your filter text, in this case a last name and click Filter.

In the results screen, click the View button in the row that matches the user record that you would like to view or modify.

Editing Users at Self Registration Districts
At self registration districts, you can modify the following user record fields, whereas at rostered districts the fields are ‘read only’:
Status: Active or Deactivated - You can deactivate any redundant accounts or accounts that are no longer needed.
First Name/Last Name: An easy way to handle name changes and corrections.
Username/email: Change the username of Teachers, Co-teachers, and Students, noting that student emails are not required by Sirius Online and are typically not used as student usernames, especially for younger children.
Change Password: Though you are not allowed to view passwords, you can change a password for a teacher or student by resetting it here.
User Timezone: N/A for current end users in Texas.
Class Teaching: Access to view the class record (for teachers only).
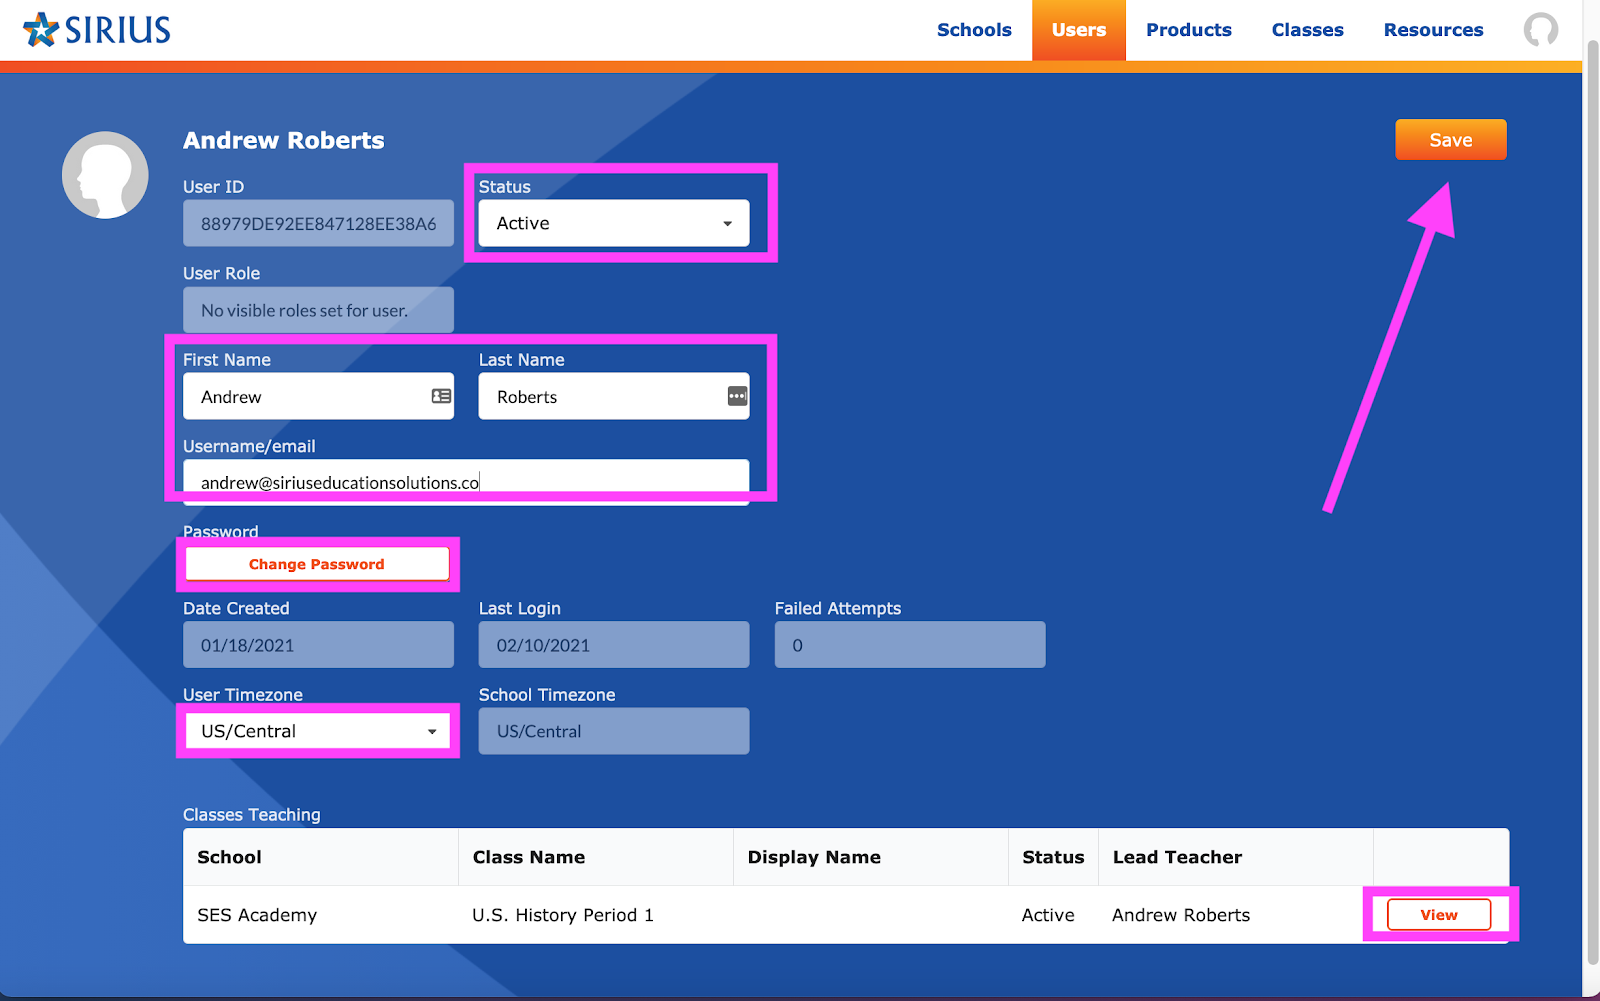
Note: Any changes that you make need to be saved by clicking the Save button in the upper right of the screen.
DAs and SAs can navigate to a teacher’s classes by clicking the view link.
Note: Admins can also edit class settings by clicking the Settings button which we’ll explore below.

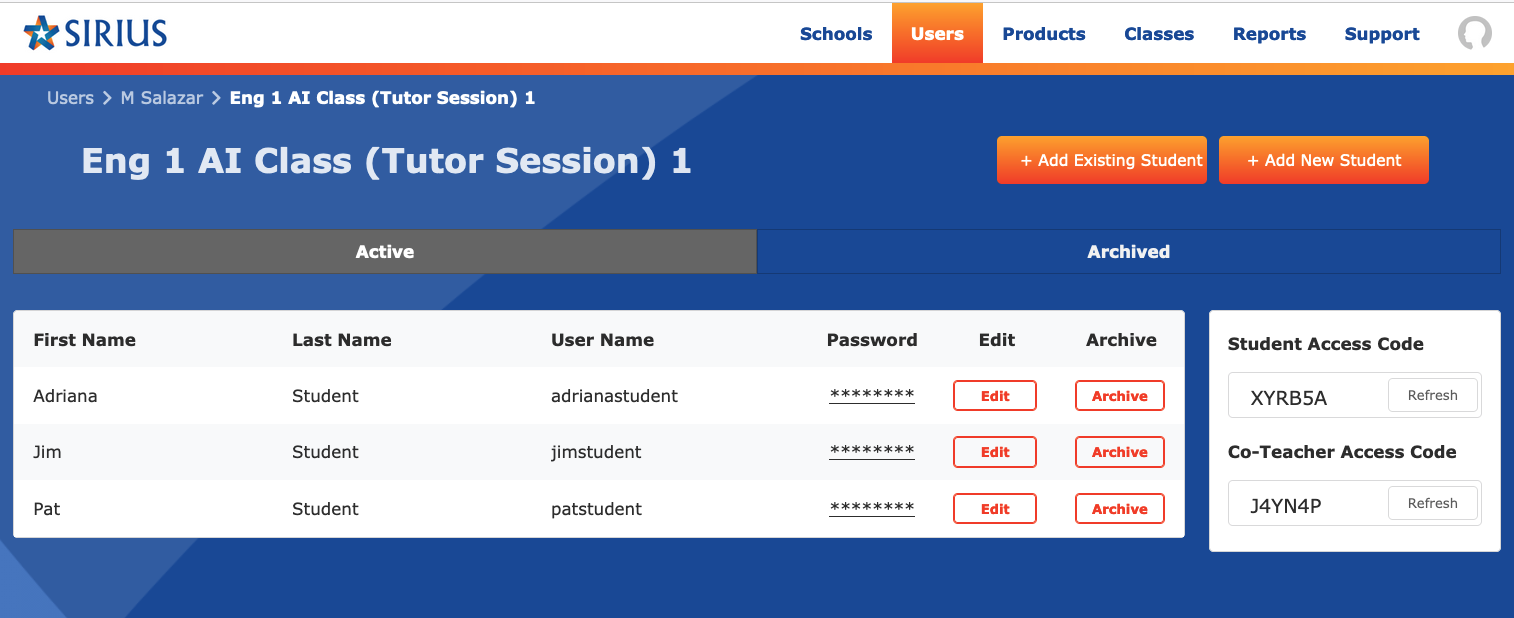
On the Class record screen, you can edit the class information by clicking Edit, Archive the class (if it is no longer available or when all teacher and student work has been completed), or Refresh Student or Co-Teacher Access codes (in the event redundant records start appearing in a class or if outside end-users are detected).
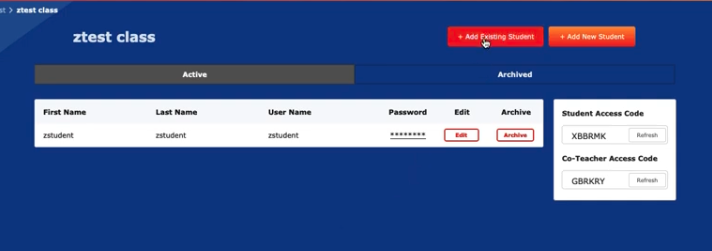
Finally, for districts who wish to have their IT staff register students (vs. students self registering themselves) they can click +Add Pre-Existing Student or +Add New Student to create a student account directly in the class without having to do so through the main login interface.
CLASSES TAB and Class Management
Searching and Reviewing Shared/Created Classes
Admins can search through classes to determine if all necessary classes have been shared with Sirius, whether the classes have the correct settings (dates and teacher assignments), as well as to review rosters.
Admins can filter through classes according to the following criteria by clicking the funnel icon to the right of each column header, including:
School
Class Name
Class ID
Lead Teacher First Name
Lead Teacher Last Name

In this example, a search for teacher Jim Bruno reveals four classes.

Reviewing/Setting Accommodations
To examine any teacher set accommodations, click the accommodations link in the row containing the class you wish to examine.

Review the accommodations that the teacher has set for the class.
Reset any accommodations for a particular student by clicking and overriding the teacher’s current selections.
At any moment, a teacher or an administrator can adjust an accommodation. The last person making the setting selection is what is currently in effect for the student.
Examining Class Rosters and Rostered Students
The classes tab allows you to search for and find a class. For any particular class, you can:
Review rosters
Edit rosters or add students (at Self Reg Districts)
Look up Student Access Codes (for Self Reg Districts)
Look up Co-teacher Access Codes for both Self Reg and Rostered Districts
*Make yourself a co-teacher for any class

Edit Student
At self registration districts, you can edit student profiles. Any editing done to student records at a rostered district eventually return to the values that your SIS provides to Sirius through a rostering partner.

Archive Student
At self registration districts, you can archive students who no longer take part in their class. At rostered districts, archiving students (or removing them from a class) must be handled by your rostering administrator for Clever, ClassLink, or Edlink.

Access Codes

Student Access Code - Use this code at a self registration district to register new students or to allow those with existing accounts to join a second or third (or new) class at Self Registration districts.
Co-teacher Access Code - Use this code to allow co-teachers and tutors to register as co-teachers for this class at either self registration or rostered districts. This code is often used to onboard tutors who need to support breakout or pullout classes as they often do not appear in a district’s shared data.
Make Me a CoTeacher
As administrators you can make yourself Co-Teachers of any classes you support or would like to review with more granularity by simply locating a class, navigating to the class’s Roster, and clicking the Make me a Co-Teacher button.

Based on your rostering method, there are some slight differences in the way you or the teacher of the class might deactivate or terminate your status as a co-teacher for a particular class:
At Self Registration districts, you or the primary teacher of the class can deactivate an administrator who has made him or herself a Co-Teacher by clicking the “x” next to their name in order to “x” out of the role. This gives administrators and teachers at self registration districts longer access to the co-teacher role and allows admins and teachers a finer level of control over the duration of an administrator’s access to a class as a co-teacher.

At Rostered districts (Clever, ClassLink, EdLink), the ability for an administrator to make him or herself a co-teacher is temporary. Access is typically granted for a period of 24 hours or until the next ‘data sync' via your rostering partner (this is due to most districts designating co-teachers at the user data level, including changes or updates that are made to your data from day to day). Because of this, administrators or teachers at rostered districts do not have the ability to remove co-teachers created by the temporary access afforded by “Make me a Co-Teacher.” For districts who would like administrators to have longer access to classes using Make me a Co-Teacher, we can disable your syncs for a period of time that you specify in order to prolong the duration of the setting.
Creating Pullout/Breakout Classes at Rostered Districts
Any administrator or teacher at a rostered district or school using Clever, ClassLink, or EdLink can now quickly create special ‘non-SIS-based classes’ using new tools available starting on May 25, 2022.
Note: District Admins can create classes spanning schools within a district. School Admins and Teachers can only create and add students from their assigned schools.
Steps
Log in to Sirius Online and click Users.
Search for a teacher who will serve as the ‘Primary Teacher’ of your new class or pullout. Be sure to use the header filters to quickly locate a specific teacher.

Once you locate the teacher for whom you’ll add a class, click the View button.
On the Teacher profile screen, click Add Class at the bottom.

Type a Class Name, and add a Start Date and End Date (always extend the end date a few weeks beyond the last day of class in order to allow teachers to wrap up their work on any given class).

Your new class appears in the Teacher profile. To add students (i.e., from your Clever, ClassLink, or EdLink shared accounts), click the View button to the right of the newly added class.

Note: You can only add currently shared students in your rostered data. You cannot self-register students outside of your rostered method.
Click the Add Existing Student link.
When you locate the student you would like to add, click the Add button
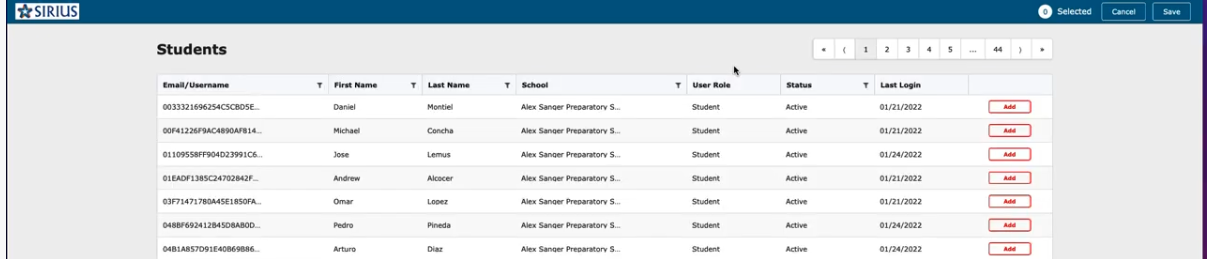
Your new student has been added to your class. Complete the same add student process for each student who needs to be a member of the new class.
You can confirm your final list of students on the Roster Screen to be sure all have been added.
Adding Images to Class Cards
Sirius Online courses include all programs purchased by your district or school.
Click the meatball icon (the three horizontal dots) in the upper right corner of the ghosted or existing image for the class in the Class Card.
From the Edit Card Image window, choose an image file less than 5 MB in size to represent your class.
Crop the image to an appropriate size if needed/
Click Crop and Save.
CONTENTS TAB: Accessing and Navigating Course Content
Academic administrators often need to examine, approve, and confirm availability of materials used in classes in order to best support instruction.
To that effort, DAs and SAs can navigate and review all materials within courses that have been purchased.
To review a program, click the Contents tab and then the View button to the right of the course or resource you would like to examine.

Once in a course, you can open each major component by clicking Open.

Note: Lessons (preparation and practice), Diagnostics, STAAR Practice, Cumulative Reviews, and Post Tests are ‘live’ auto-graded/computer-scored activities that teachers review in the Gradebook prior to release of scores to students and to reports.
For more on navigating course materials, please see the How to Use Guide: Teachers, especially Section 3: Navigating Sirius Online > Navigating a Course.
5. DISTRICT AND SCHOOL REPORTS
Administrators can access and review all reports that teachers can create, view, and access, including Course and Standards Performance and Usage Reports.
Note: In January 2022, Administrators have been given access to Progress and Engagement reports through their main reports interface.
The following steps describe how to access if you are logged in as a District or School administrator.
On your main Reports dashboard, click View Report for either a Course Report or a Standards report by district or by school (based on whether you are a DA or SA).

Course Reports: View Report
On the main landing page, select a course from the Course menu pulldown. In this example a School Administrator is going to examine Algebra 1 v3.0.

The resulting screen displays a District or School Average according to your role. Be sure to turn down the course caret to show all related activities. You can also show or hide content without scores by clicking the associated toggle.
Click the Details link to drill into the report by teacher/class.

To drill even deeper into a particular class and student, click the column teacher/class icon to review that report (the class report that a teacher can view).
You can also move from performance to class usage data by clicking the Usage (minutes) button to review the following screen. This report also displays usage data in minutes as a school average (according to activity assignments) and also by teacher/class.

As with Performance reports, administrators can drill into each teachers’ class by clicking the column header icon and see how individual students are spending their time on activities.
New in 2023-24:
Access to Teacher/Class Scorecards by Activity
As a DA or SA, you can now navigate to the classroom level and view data for distinct activities completed by a class and then “jump” to the raw Scorecard Data for any individual completed assignment. Scorecard data includes item analysis scores for each student, usage (time) spent, and raw engagement data for each student for that activity.
To view any class’s Scorecard for a particular activity, navigate to the Class Summary for a particular teacher’s class, and click the View button associated with a particular activity done at a corresponding Class level (as below):

Export a Activity Data for All Students at a School Who Have Completed an Activity
Also new in Sirius Online 2023-24, District and School Admins can export activity data by school for all students who have completed individual activities or assessments from the Course Report.
To export data from the Course Report > School Summary > School Detail (by Class) –i.e., all the classes that have completed work in a given Sirius Course –simply click the download icon aligned with the activity that you wish to export data for.

In the subsequent dialog box that appears, be sure to check the Item Analysis Export prior to clicking the Send button.

You (or the person you’ve emailed the report to) will receive an email with a link that allows you to download the CSV with item analysis data, including standards, for all students at a school who have completed the assignment.
Standards Reports for Administrators
On the main Reports screen, click the View Report button on the right within the standards report.
Select your course’s Standards and the manner by which you wish to filter (by Standards is default).

Click the caret to turn down the list of standards according to your filter selection.

Use the Class Navigator highlighted in magenta to scroll horizontally through each screen of classes.
Click any column header icon for Teacher/Class to view the Class Standards report (from which you can drill further into the report, students performance, or usage by standard).
Note: Please note that Standards Usage reports, such as in the screenshot below, display time spent on a given standard. If an item correlates to more than one item, the usage data for that item will appear for each different standard to which that item correlates.

Related Articles
How to Use Guide | SES 101 Introduction to Sirius Online Participant Guide: Teachers, Co-Teachers, Tutors (Updated 03/19/24); PDF of Student Guide Attached!
Please download and review the Student Guide below. You'll also be able to download the Teacher Guide below with more styled formatting. Consider sharing the Student Guide PDF (Link forthcoming) with students. Currently students are not allowed on ...Top Resources for District and School Administrators (Updated 7.28.23)
1. System Requirements and Rostering in Sirius Online (Formerly Getting Started Guide) - All about getting Sirius Online up and running at your district/school, including onboarding and rostering. ...How to Use Guide: Students (Updated: 07.13.23)
Note to Educators: As we like to keep students from accessing our open support and knowledge base site (where you are viewing this article now), please do not share the link to this resource with students as displayed in your browser field (you can ...VIDEO: Sirius Online User Experience Overview: Administrators (22:35)
Firewall-friendly: https://publisher.content2classroom.com/api/publicRedirectToResource?contentItemId=6E4628B157264FC4986E1E49790E5738 Youtube/Streaming-friendly: 00:00 Introduction - Who should use this video; objectives; onboarding of ...How to Use Guide: Sirius STAAR Assessment Bank (SSAB) and Test Builder, V.01 (DA's & SA's)
For Customers who have purchased SSAB Test Builder at the District or Campus level. For District and School Admins/Staff who are involved in Benchmark Test Creation; For those who have participated in SES 301. About This Guide This guide supports ...